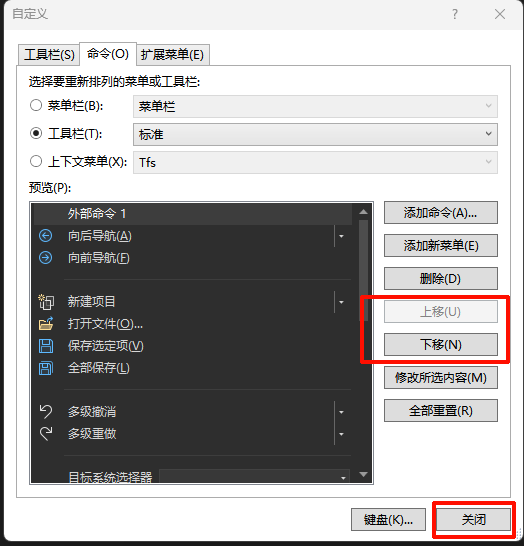

最终实现效果

点击对应按钮(按钮名字可自定义),即可实现对应功能,开始编译后也可以再次点击进行停止。
一、查找MSBuild所在目录※
- 这里以Visual Studio 2019为例,其他版本的VS MSBuild所在目录可能不同,自行查找所在目录。
- VS 2019 MSBuild默认路径:
C:\Program Files (x86)\Microsoft Visual Studio\2019\Community\MSBuild\Current\Bin\MSBuild.exe二、编写脚本※
实现具体编译项目及编译顺序控制依赖于外部脚本实现,脚本创建方法如下:
- 新建一个文本文件,文件名任意,后缀名改为
.proj,这里以buildUtil.proj为例。 用文本编辑工具打开
buildUtil.proj,写入下列内容:<?xml version="1.0" encoding="utf-8"?> <Project xmlns="http://schemas.microsoft.com/developer/msbuild/2003"> <PropertyGroup> <Config>Release</Config> <Platform>x64</Platform> </PropertyGroup> <Target Name="BuildAll"> <!-- 这里Item顺序就是编译顺序 --> <MSBuild Projects=".\src\ProjectA\ProjectA.vcxproj" Properties="Configuration=$(Config);Platform=$(Platform)" BuildInParallel="false"/> <MSBuild Projects=".\src\ProjectB\ProjectB.vcxproj" Properties="Configuration=$(Config);Platform=$(Platform)" BuildInParallel="false"/> <MSBuild Projects=".\src\MainApp\MainApp.vcxproj" Properties="Configuration=$(Config);Platform=$(Platform)" BuildInParallel="false"/> </Target> </Project>大框架按上述内容写,不要修改,其中,

Config的值修改为解决方案配置的值,也就是上图红圈中的Debug,一般是Debug、Release这类,具体看VS中配置的Platform修改为解决方案平台的值,上图红圈中的x64,具体还是看工程配置。Target中Name的值可以任意,只是起到个标识的作用,给后面脚本调用时传参。MSBuild中,Projects的值就是每个项目的.vcxproj文件的路径,可以是绝对路径,也可以相对于当前buildUtil.proj的路径,其后的BuildInParallel就是表示是否要并行编译,这里值设置为false让这些项目按照先后顺序串行编译。Properties值照抄即可。如果要让这个项目进行清理后重新编译,还需要加上Targets="Rebuild",完整格式如下:<MSBuild Projects=".\src\MainApp\MainApp.vcxproj" Properties="Configuration=$(Config);Platform=$(Platform)" Targets="Rebuild" BuildInParallel="false"/>要实现最开头的增量编译和全量编译并存,脚本可以写成如下形式:
<?xml version="1.0" encoding="utf-8"?>
<Project xmlns="http://schemas.microsoft.com/developer/msbuild/2003">
  <PropertyGroup>
    <Config>Release</Config>
    <Platform>x64</Platform>
  </PropertyGroup>
  <Target Name="BuildAll">
    <!-- 这里是增量编译 -->
    <!-- 这里Item顺序就是编译顺序 -->
    <MSBuild Projects=".\src\ProjectA\ProjectA.vcxproj" Properties="Configuration=$(Config);Platform=$(Platform)" BuildInParallel="false"/>
    <MSBuild Projects=".\src\ProjectB\ProjectB.vcxproj" Properties="Configuration=$(Config);Platform=$(Platform)" BuildInParallel="false"/>
    <MSBuild Projects=".\src\MainApp\MainApp.vcxproj" Properties="Configuration=$(Config);Platform=$(Platform)" BuildInParallel="false"/>
  </Target>


<Target Name="RebuildAll">

  <!-- 这里是全量编译 -->

    <MSBuild Projects=".\src\ProjectA\ProjectA.vcxproj" Properties="Configuration=$(Config);Platform=$(Platform)" Targets="Rebuild" BuildInParallel="false"/>
    <MSBuild Projects=".\src\ProjectB\ProjectB.vcxproj" Properties="Configuration=$(Config);Platform=$(Platform)" Targets="Rebuild" BuildInParallel="false"/>
    <MSBuild Projects=".\src\MainApp\MainApp.vcxproj" Properties="Configuration=$(Config);Platform=$(Platform)" Targets="Rebuild" BuildInParallel="false"/>
  </Target>
</Project>
配置VS菜单按钮※
前面的脚本可以单独在外部通过命令行运行:
"C:\Program Files (x86)\Microsoft Visual Studio\2019\Community\MSBuild\Current\Bin\MSBuild.exe" buildUtil.proj /t:BuildAll- 这里通过
/t:传入参数,其后的值就是buildUtil.proj中Target的Name的值。
但是这种方式,如果编译失败,无法直接跳转对应位置,因此将其配置到Vs中,可以更方便查看错误。
- 这里通过
- 通过VS来调用脚本
点击菜单栏→工具→外部工具
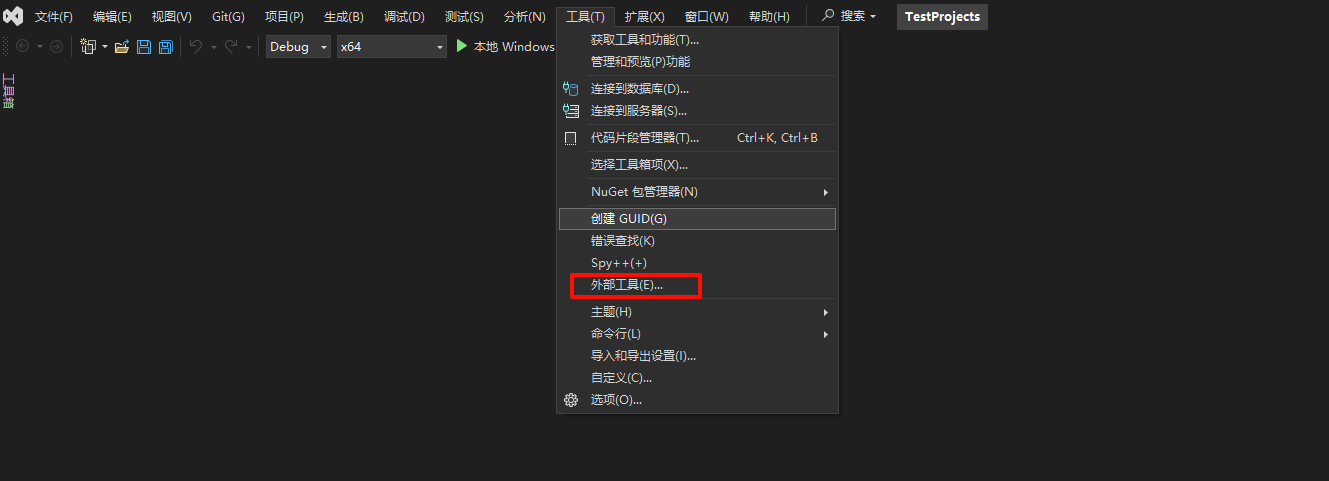
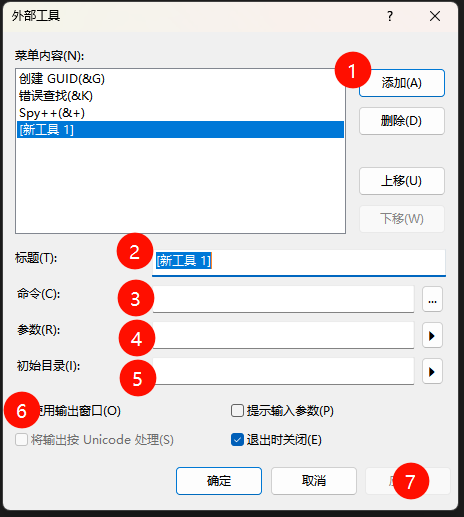
- 点击
添加按钮,- 标题:要显示到菜单栏的标题
- 命令:填
MsBuild所在路径 参数:填入
.proj名字及要/t:相关参数(要用分号隔开),例如:buildUtil.proj /t:BuildAll初始目录:如果
buildUtil.proj中没有写相对路径,这里可以放空,否则要写buildUtil.proj所在路径,可以写buildUtil.proj相对于当前解决方案的路径,其格式如下:$(SolutionDir)../../buildUtil.proj其含义为:
buildUtil.proj位于当前解决方案(即xxx.sln文件)上两层目录下。- 勾选
使用输出窗口,这样才能在底下输出编译信息,通过错误信息进行跳转。 点击应用,确定即可。
- 配置到菜单栏
点击菜单栏→工具→自定义
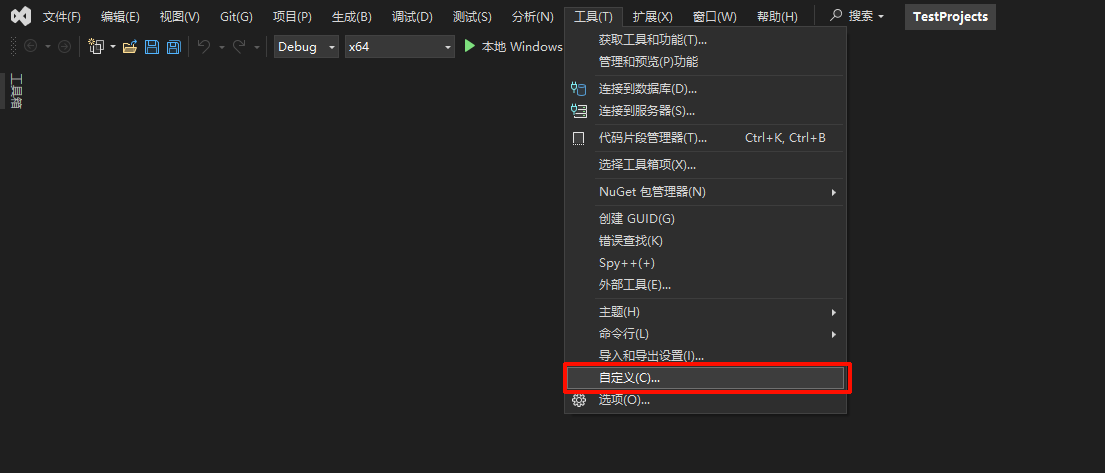
切换到
命令,选择工具栏,将工具栏切换到标准,点击添加命令。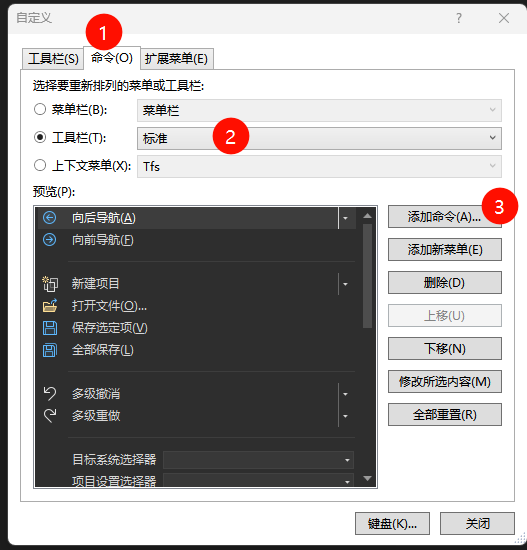
点击
工具,选择外部命令x。这里外部命令x中的x取决于前一步添加外部工具时,菜单内容中新增的工具所在位置。再点击确定会自动关闭当前窗口。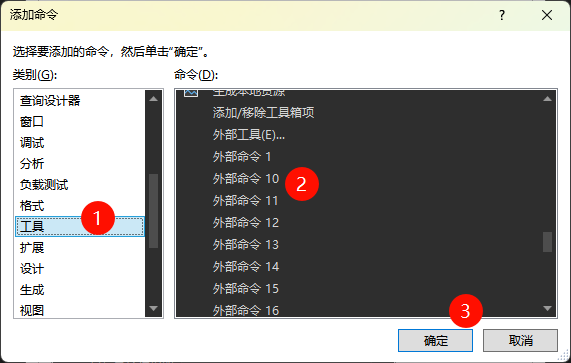
可以点击
上移或下移调整新增按钮的位置,调整完点击关闭即可显示在菜单栏上。